AEM Series 2 Plug Play EMS 306051 User Manual
Here you can view all the pages of manual AEM Series 2 Plug Play EMS 306051 User Manual. The AEM manuals for Series 2 Plug & Play EMS are available online for free. You can easily download all the documents as PDF.
Page 1
Page 1 of 15
Installation Instructions for:
EMS P/N 30-6051
(4 cylinder Acura/Honda vehicle with 6 cylinder engine and harness swap)

Vehicle:
2000-2001 Acura Integra
1998-1999 Acura 2.3CL
1996-2000 Honda Civic

Engine wiring harness:
1999-2002 Honda Accord V6 J30A1
1999 Acura CL 3.0L J30A
2001-2003 Acura CL 3.2L J32A1 (auto harness only)
1999-2003 Acura TL 3.2L J32A1
2002-2003 Acura CL/TL 3.2L Type S J32A2 (auto harness only)...
Page 2
Page 2 of 15
Thank you for purchasing an AEM Engine Management System.

The AEM Engine Management System (EMS) is the result of extensive development on a
wide variety of cars. Each system is engineered for the particular application. The AEM
EMS differs from all others in several ways. The EMS is a stand alone system, which
completely replaces the factory ECU and features unique Plug and Play Technology,
which means that each system is configured especially for your make and model of car...
Page 3
Page 3 of 15
Read and understand these instructions BEFORE attempting to install this product.
• OE Speedometer Functionality

Please note that the 30-6051 EMS is configured to drive the original 1996-2000
Honda Civic speedometer by outputting the appropriate signal on pin A9. This
signal is calibrated to use the OE Honda Civic dashboard, replacing the OE
speedometer with one from a different vehicle may change the behavior of the
gauge.

• Engine Wiring Harnesses, ‘swapped’ engine...
Page 4
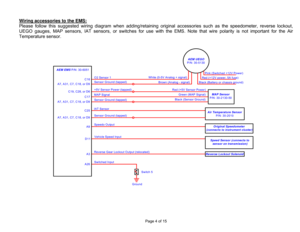
Page 4 of 15 Wiring accessories to the EMS:

Please follow this suggested wiring diagram when adding/retaining original accessories such as the speedometer, reverse lockout,
UEGO gauges, MAP sensors, IAT sensors, or switches for use with the EMS. Note that wire polarity is not important for the Air
Temperature sensor.

+5V Sensor Power (tapped)Reverse Gear Lockout Output (relocated)
A7, A31, C7, C18, or D9
Switched Input
A26A3 D11A9Speedo Output
Vehicle Speed Input C17
A7, A31, C7, C18, or D9...
Page 5
Page 5 of 15
1)  Install AEMTuner software onto your PC
The latest version of the AEMTuner software can be downloaded from the AEMTuner
section of the AEM Performance Electronics forums. Series 2 units are not supported
by the older AEMPro tuning software.

2)  Remove the Stock Engine Control Unit
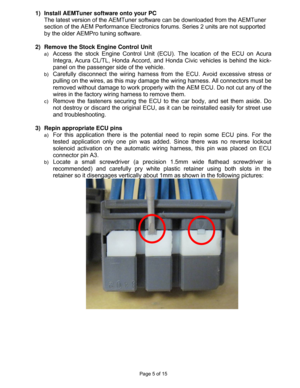
a) Access the stock Engine Control Unit (ECU). The location of the ECU on Acura
Integra, Acura CL/TL, Honda Accord, and Honda Civic vehicles is behind the kick-
panel on the passenger side of the...
Page 6
Page 6 of 15

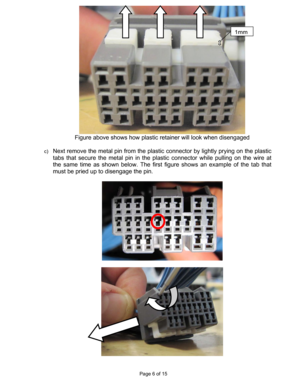
Figure above shows how plastic retainer will look when disengaged

c) Next remove the metal pin from the plastic connector by lightly prying on the plastic
tabs that secure the metal pin in the plastic connector while pulling on the wire at
the same time as shown below. The first figure shows an example of the tab that
must be pried up to disengage the pin.


1mm
Page 7
Page 7 of 15
4)  Install the AEM Engine Management System
a) Plug the factory wiring harness into the AEM EMS and position it so the wires are
not pulled tight or stressed in any manner. Secure the EMS with the provided Velcro
fasteners.
b) Plug the comms cable into the EMS and into your PC.
c) Turn the ignition on, but do not attempt to start the engine.
d) At the time these instructions were written, new EMS units do not require USB
drivers to be installed on the PC.
e) With the AEMTuner...
Page 8
Page 8 of 15
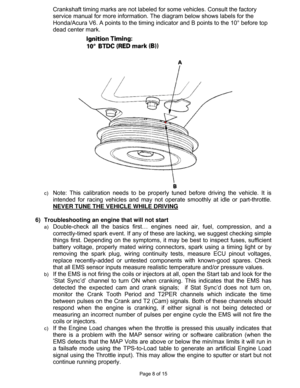
Crankshaft timing marks are not labeled for some vehicles. Consult the factory
service manual for more information. The diagram below shows labels for the
Honda/Acura V6. A points to the timing indicator and B points to the 10° before top
dead center mark.

c) Note: This calibration needs to be properly tuned before driving the vehicle. It is
intended for racing vehicles and may not operate smoothly at idle or part-throttle.
NEVER TUNE THE VEHICLE WHILE DRIVING


6) Troubleshooting...
Page 9
Page 9 of 15
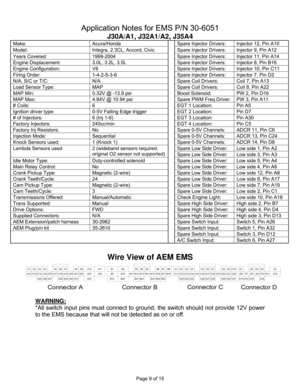
Application Notes for EMS P/N 30-6051
J30A/A1, J32A1/A2, J35A4
Make: Acura/Honda Spare Injector Drivers:  Injector 12, Pin A10
Model:  Integra, 2.3CL, Accord, Civic  Spare Injector Drivers:  Injector 9, Pin A12
Years Covered:  1999-2004  Spare Injector Drivers:  Injector 11, Pin A14
Engine Displacement:  3.0L, 3.2L, 3.5L  Spare Injector Drivers:  Injector 8, Pin B16
Engine Configuration:  V6  Spare Injector Drivers:  Injector 10, Pin C11
Firing Order:  1-4-2-5-3-6  Spare Injector...
Page 10
Page 10 of 15
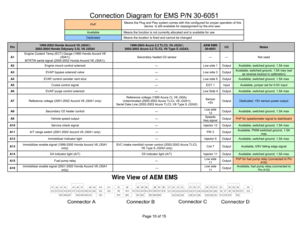
Connection Diagram for EMS P/N 30-6051

PnP Means the Plug and Play system comes with this configured for proper operation of this
device. Is still available for reassignment by the end user. Available  Means the function is not currently allocated and is available for use Dedicated  Means the location is fixed and cannot be changed

Pin
1999-2002 Honda Accord V6 J30A1;
2002-2004 Honda Odyssey 3.5L V6 J35A4
1999-2003 Acura 3.2 TL/CL V6 J32A1;
2002-2003 Acura 3.2 TL/CL V6 Type S...


