AEM TruTime Adjustable Cam Gear 23830BK User Manual
Here you can view all the pages of manual AEM TruTime Adjustable Cam Gear 23830BK User Manual. The AEM manuals for Tru-Time Adjustable Cam Gears are available online for free. You can easily download all the documents as PDF.
Page 1
ADVANCED ENGINE MANAGEMENT INC.
2205 126th. St. Unit A
Hawthorne, CA 90250
Http://www.aempower.com

Instruction part # 10-253
© 2003 Advanced Engine Management, Inc.


TRU-TIME
CAM
GEARS

Mitsubishi Eclipse Turbo
Part number 23 – 830 series

WARNING:
,!
This installation is not for the mechanically challenged! If you
are not mechanically inclined or do not understand the
procedure please do not attempt the installation. Refer the
installation to a reputable mechanic. It is highly...
Page 2
You have just purchased the BEST adjustable cam sprockets available. These AEM billet
aluminum adjustable cam sprockets are CNC machined from billet aluminum and then laser
etched with cam timing marks for adjustment up to ±10° at the cam or ±20° at the crankshaft.
Using the vernier scale on the sprocket hub helps to do the cam timing changes quickly and
accurately. The inner hub is anodized for lasting beauty and resistance to corrosion. The out
gear sector is hard anodized for resistance to...
Page 3
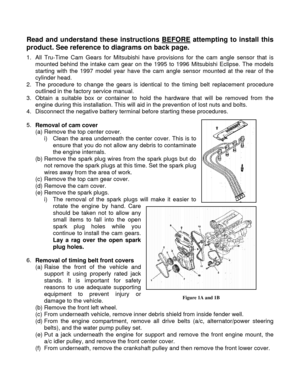
Figure 1A and 1B
Read and understand these instructions BEFORE attempting to install this
product. See reference to diagrams on back page.
1.  All Tru-Time Cam Gears for Mitsubishi have provisions for the cam angle sensor that is
mounted behind the intake cam gear on the 1995 to 1996 Mitsubishi Eclipse. The models
starting with the 1997 model year have the cam angle sensor mounted at the rear of the
cylinder head.
2.  The procedure to change the gears is identical to the timing belt...
Page 4
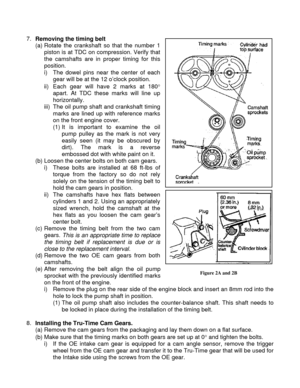
Figure 2A and 2B
7. Removing the timing belt
(a) Rotate the crankshaft so that the number 1
piston is at TDC on compression. Verify that
the camshafts are in proper timing for this
position.
i)  The dowel pins near the center of each
gear will be at the 12 o’clock position.
ii)  Each gear will have 2 marks at 180°
apart. At TDC these marks will line up
horizontally.
iii)  The oil pump shaft and crankshaft timing
marks are lined up with reference marks
on the front engine cover.
(1) It...
Page 5
Figure 3A, 3B, and 3C
(c) Install the gears on to the camshafts. Tighten the bolts to the proper factory
specification (68 ft-lbs). As discussed in the removal section, hold the camshaft at the
hex flats as you tighten the gears.
(d) From the exhaust cam remove the bolt that is at the 10 o’clock position and from the
intake cam remove the bolt from the 2 o’clock position.

9. Installing timing belt
(a) Install the timing belt on the intake cam. Make
sure that the gear is at the proper...
Page 6
Figure 4
10. Resetting the tension pulley
(a) The following procedures are to be completed if the tensioner pulley was loosened
during the removal of the timing belt.
(b) With the automatic tensioner in place, loosen the tension pulley-fixing bolt.
(c) With a suitable tool rotate the tension-pulley
counter clockwise and apply 3 ft-lbs to the
center eccentric while tightening the fixing
bolt. Do not allow the eccentric to rotate with
the center bolt as you tighten it (refer to
factory...
Page 7
on the street and STRONGLY recommend the timed acceleration tests be carried
out at a racetrack.) The method we use to perform the timed tests is to start at a
constant engine RPM in second gear (both for manual and automatic transmission) and
then accelerate to the vehicle redline while recording the time it takes to reach redline.
We perform this test at least 3 times to establish an average reference point. Notice that
there is no shifting or tire burning (if you do have a traction problem,...
Page 8
Reference to diagrams:

Figure 1A
Diagram showing the arrangement of spark plug wires and top center cover.
Figure 1B 1.  Drive belt (alternator)
2.  Drive belt (power steering)
3.  Tensioner pulley bracket (air conditioner)
4.  Drive belt (air conditioner)
5.  Pulley (water pump)
6.  Pulley (power steering)
7. Pulley (crankshaft)
8.  Timing belt cover (upper)
9.  Timing belt cover (center)
10.  Timing belt cover (lower)
11. Timing belt
12.  Tensioner pulley (timing belt)
13.  Auto...


