NEC Accusync Lcd223wm Users Manual
Here you can view all the pages of manual NEC Accusync Lcd223wm Users Manual. The NEC manuals for Monitor are available online for free. You can easily download all the documents as PDF.
Page 2
English
English-1
Declaration
Declaration of the Manufacturer
TO PREVENT FIRE OR SHOCK HAZARDS, DO NOT EXPOSE THIS UNIT TO RAIN OR MOISTURE. ALSO, DO NOT
USE THIS UNIT’S POLARIZED PLUG WITH AN EXTENSION CORD RECEPTACLE OR OTHER OUTLETS UNLESS
THE PRONGS CAN BE FULLY INSERTED.
REFRAIN FROM OPENING THE CABINET AS THERE ARE HIGH VOLTAGE COMPONENTS INSIDE. REFER
SERVICING TO QUALIFIED SERVICE PERSONNEL.
WARNING
CAUTION
CAUTION:TO REDUCE THE RISK OF ELECTRIC SHOCK, DO NOT REMOVE COVER (OR BACK). NO USER...
Page 3
English-2
For the Customer to use in U.S.A. or Canada
Canadian Department of Communications Compliance Statement
DOC: This Class B digital apparatus meets all requirements of the Canadian Interference-Causing Equipment Regulations.
Cet appareil numérique de la classe B respecte toutes les exigences du Règlement sur le matériel brouiller du Canada.
C-UL: Bears the C-UL Mark and is in compliance with Canadian Safety Regulations according to CSA C22.2 No. 60950-1.
Ce produit porte la marque ‘C-UL’ et se...
Page 4
English
English-3
Contents
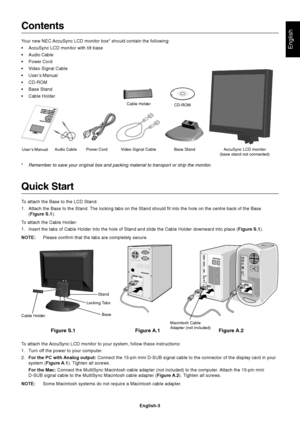
Your new NEC AccuSync LCD monitor box* should contain the following:
•AccuSync LCD monitor with tilt base
•Audio Cable
•Power Cord
•Video Signal Cable
•User’s Manual
•CD-ROM
•Base Stand
•Cable Holder
*
Remember to save your original box and packing material to transport or ship the monitor.
Quick Start
To attach the Base to the LCD Stand:
1. Attach the Base to the Stand. The locking tabs on the Stand should fit into the hole on the centre back of the Base
(Figure S.1).
To...
Page 5
English-4
3. Connect the 15-pin mini D-SUB of the video signal cable and Audio Cable to the appropriate connector on the back of the
monitor (Figure B.1). Connect the Headphone (not included) to the appropriate connector at the front of the monitor
(Figure C.1).
4. Connect one end of the power cord to the monitor and the other end to the power outlet. Place the Video Signal Cable and
power cord to the Cable holder (Figure B.1).
NOTE:Adjust position of cable that place under the Cable holder to avoid...
Page 6
English
English-5
Figure R.1
Non-abrasive surface
Figure R.2 Figure R.3
Removing the Base
NOTE:Always remove the Base when shipping the LCD.
1. Place monitor face down on a non-abrasive surface (Figure R.1).
2. While using your fingers, press the locking tabs to unlock the Base.
3. Pull out the unlocked Base.
Connecting a Flexible Arm
This LCD monitor is designed for use with a flexible arm.
Please use the attached screws (4pcs) as shown in the picture when installing. To meet the safety requirements,...
Page 7
English-6
Controls
OSD (On-Screen Display) control buttons on the front of the monitor function
as follows:
1. Basic function at pressing each key
2. OSD structure
Showing OSD.Shortcut to Bright adjust
window.
Button
At No OSD
showingShortcut to Volume adjust
window.“Auto adjust” operate.
At OSD showing(Icon selection stage)Go to Adjustment stage. Cursor goes to left. Cursor goes to right.
At OSD showing(Adjustment stage)Go to Icon selection stage. Adjust value decrease or
Cursor for adjust goes to...
Page 8
English
English-7
AUDIO
Controls the volume of the speakers or headphones.
To mute the speaker output, press the “AUTO/RESET” button.
BRIGHTNESSAdjusts the overall image and background screen brightness.
CONTRAST
Adjusts the image brightness in relation to the background.
AUTO CONTRAST
Adjusts the image displayed for non-standard video inputs.
AUTO ADJUST
Automatically adjusts the Image Position, the H. Size and Fine setting.
LEFT/RIGHT
Controls Horizontal Image Position within the display area of the...
Page 9
English-8
OSD LOCK OUT
This control completely locks out access to all OSD control functions without Brightness and Contrast. When
attempting to activate OSD controls while in the Lock Out mode, a screen will appear indicating the OSD are
locked out. To activate the OSD Lock Out function, press “AUTO/ RESET”, then “+” key and hold down
simultaneously. To de-activate the OSD Lock Out, press “AUTO/ RESET”, then “+” key and hold down
simultaneously.
RESOLUTION NOTIFIER
If ON is selected, a message will...
Page 10
English
English-9
Recommended use
Safety Precautions and Maintenance
FOR OPTIMUM PERFORMANCE, PLEASE NOTE
THE FOLLOWING WHEN SETTING UP AND
USING THE ACCUSYNC LCD COLOUR MONITOR:
•DO NOT OPEN THE MONITOR. There are no user serviceable parts inside and opening or removing covers may expose
you to dangerous shock hazards or other risks. Refer all servicing to qualified service personnel.
•Do not spill any liquids into the cabinet or use your monitor near water.
•Do not insert objects of any kind into the...


