Zanussi Essential 6 Kg Manual
Here you can view all the pages of manual Zanussi Essential 6 Kg Manual. The Zanussi manuals for Washing Machine are available online for free. You can easily download all the documents as PDF.
Page 2
Contents
Safety information _ _ _ _ _ _ _ _ _ _ _ _ _ _ _ _ _ _  2
Frost precaution _ _ _ _ _ _ _ _ _ _ _ _ _ _ _ _ _ _ _  4
Environment concerns _ _ _ _ _ _ _ _ _ _ _ _ _ _ _ _  4
Product description _ _ _ _ _ _ _ _ _ _ _ _ _ _ _ _ _  5
Technical data _ _ _ _ _ _ _ _ _ _ _ _ _ _ _ _ _ _ _  5
Installation _ _ _ _ _ _ _ _ _ _ _ _ _ _ _ _ _ _ _ _ _  6First use _ _ _ _ _ _ _ _ _ _ _ _ _ _ _ _ _ _ _ _ _ _  10
Daily use _ _ _ _ _ _ _ _ _ _ _ _ _ _ _ _ _ _ _ _ _  10
Washing programmes _ _ _ _ _ _ _ _ _ _ _ _ _...
Page 3
not pressing the electrical supply cable against the
wall.
• Install the appliance on a flat hard floor.
• Never place cardboard, wood or similar materials un-
der the appliance to compensate for any unevenness in
the floor.
• If the appliance is situated on a carpeted floor, please
adjust the feet in order to allow air to circulate freely
under the appliance.
• Check that the appliance does not touch the wall or
other kitchen units.
•This appliance must be connected to a cold water sup-
ply.
• Do not...
Page 4
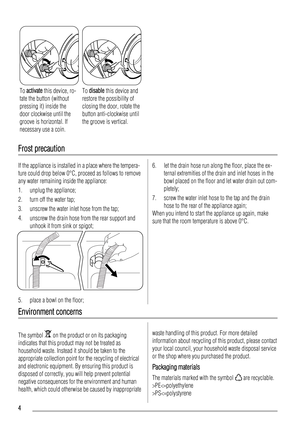
To activate this device, ro-
tate the button (without
pressing it) inside the
door clockwise until the
groove is horizontal. If
necessary use a coin.To disable this device and
restore the possibility of
closing the door, rotate the
button anti-clockwise until
the groove is vertical.
Frost precaution
If the appliance is installed in a place where the tempera-
ture could drop below 0°C, proceed as follows to remove
any water remaining inside the appliance:
1. unplug the appliance;
2. turn off the water...
Page 6
Electrical connection
Voltage - Overall power - FuseInformation on the electrical connection is given on the rating plate, on the
inner edge of the appliance door.
Water supply pressureMinimum
Maximum0,05 MPa
0,8 MPa
Maximum LoadCotton6 kg
Spin SpeedMaximum1400 rpm
Installation
Unpacking
Warning!
• Read carefully the Safety information chapter
before installing the appliance.
x 3
x 3
x 2x 1
B A
C
Warning! Remove and keep all transit devices so
that they can be refitted if the appliance ever has
to be...
Page 7
• Open the door and re-
move the plastic hose
guide, the bag contain-
ing the instruction
booklet and the plastic
plug caps from the
drum.
• Remove the power supply cable and the draining and
inlet hose from the hose holders (C) on the rear of
the appliance.
• Unscrew the three bolts (A) and remove the hose
holders (C).
• Slide out the relevant plastic spacers (B).
Warning! Do not re-
move the drain hose
from the rear support. Re-
move this hose only if it is
necessary to drain the wa-
ter. Refer to...
Page 8
Positioning and levelling
x 4
Level the appliance by raising or lowering the feet.
The appliance MUST be level and stable on a flat hard
floor. If necessary, check the setting with a spirit level.
Any necessary adjustment can be made with a spanner.
Accurate levelling prevents vibration, noise and dis-
placement of the appliance during operation.
Repeat the levelling action, if the appliance is not level
and stable.
Water inlet
Connect the hose to a tap
with a 3/4” thread.
35°
45°
Loosen the ring nut to...
Page 9
Push the drain hose onto the spigot and secure with a
clip, ensure a loop is formed in the drain hose to pre-
vent waste from the sink entering the appliance.
If the outlet spigot has not been used before, remove
any blanking plug that may be in place.
•Directly into a drain pipe at a height of not less than
60 cm and not more than 100 cm.
MAX 100cm
The end of the drain hose
must always be ventilated,
i.e. the inside diameter of
the drain pipe must be
larger than the outside di-
ameter of the drain...
Page 10
In the interest of the environment
The appliance should be connected to the FOUL drainage
system, the water will then be taken to a sewage works for
treatment before being discharged safely into a river.
It is essential that these appliances are not connected to
the surface water drainage system as this water is dis-
charged directly into a river or stream and may cause pol-
lution.
If you require any further advice please contact your local
water authority.
SHOWER
WASHING
MACHINEDISHWASHER...


