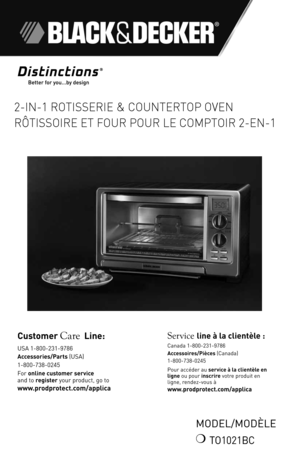
Black and Decker Toaster Oven TO1021BC User Manual
Here you can view all the pages of manual Black and Decker Toaster Oven TO1021BC User Manual. The Black and Decker manuals for Oven are available online for free. You can easily download all the documents as PDF.
Page 1
2-IN-1 ROTISSERIE \L& COUNTERTOP OVEN
RÔTISSOIRE ET FOUR\L POUR LE CO\fPTOIR 2\L-EN-1
Model/ModÈle
❍	To1021BC
Customer Care Line:

USA	1-800-2\f1-9786
Accessories/Parts \bUSA)
1-800-7\f8-0245
For	online customer ser\fice
and	to	register	your	product,	go	to
www.\brod\brotect.com/a\b\blica
Service line à la clientèle :
Canada	1-800-2\f1-9786
Accessoires/Pièces \bCanada)
1-800-7\f8-0245
Pour	accéder	au	ser\fice à la clientèle en
ligne	ou	pour	inscrire	votre	produit	en
ligne,	rendez-vous	à...
Page 2
2\f
Please Read and Sa\fe this Use and Care Book.
IMPORTANT SAFEGUARDS
When
using	electrical	 appliances,	 basic	safety	 precautions	 should	always
be	 followed,	 including	 the	following:
❑	 Read	 all	instructions.
❑	 do	 not	 touch	 hot	surfaces.	 Use	handles	 or	knobs.
❑	 To	protect	 against	 electrical	 shock	do	not	 immerse	 cord,	plugs	 or
appliance	 in	water	 or	other	 liquid.
❑	 Close	 supervision	 is	necessary	 when	any	appliance	 is	used	 by	or	near
children.
❑	 Unplug	 from	outlet	 when...
Page 3
45
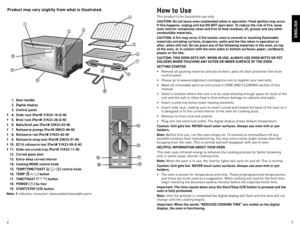
Product may \fary slightly from what is illustrated.

1. Door handle
  2. Digital dis\blay
  3. Control \banel
†  4. Slide rack (Part# 31K23-16-D-N)
†  5. Broil rack (Part# 31K23-26-D-N)
†  6. Bake/broil \ban (Part# 32K23-03-N)
†  7. Rotisserie \brongs (Part# 38K23-44-N)
†  8. Rotisserie rod (Part# 31K23-42-N)
†  9. Rotisserie wing nuts (Part# 33K23-01-N)
†  10.  EZ fit rotisserie tool (Part# 31K23-56-D-N)
†	 11.  Slide-out crumb tray (Part# 31K23-11-N)
  12.  Cur\fed glass door
  13.  Extra-dee\b...
Page 4
67
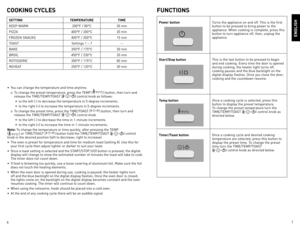
•	 You	can	change	the	temperature	and	time	anytime.
o	 To	change	the	preset	temperature,	press	the	TeMP	\b
)	button,	then	turn	and
release	the	TIMe/TeMP/T oAST	\b)	control	knob	as	follows:
•	 to	the	left	\b-)	to	decrease	the	temperature	in	5-degree	increments.
•	 to	the	right	\b+)	to	increase	the	temperature	in	5-degree	increments.
o	 To	change	the	preset	time,	press	the	TIMe/T oAST	\b
)	button,	then	turn	and
release	the	TIMe/TeMP/T oAST	\b)	control	knob
•	 to	the	left	\b-)	to	decrease	the	time	in...
Page 5
89
Tem\b/Time/Toast control knob
Turn
this	knob	 to	change	 the	displayed
temperature	 or	time	 for	food	 to	be	 cooked.
•	 to	 the	left	 \b-)	to	decrease	 the	temperature
in	 5-degree	 increments	 or	time	 in	1-minute
increments.
•	 to	 the	right	 \b+)	to	increase	 the	temperature
in	 5-degree	 increments	 or	time	 in	1-minute
increments.
This	 knob	 is	also	 used	 to	select	 the	toast	 shade
from	 1	to	 7.	The	 oven	 is	preset	 at	4.	Use	 this	for
the	 first	 toasting	 you	do	in	the	 oven.
To...
Page 6
1011
begin	to	preheat	and	will	count	down	from	the	preset	time	once	preheating	is	complete.
KEEP WARM FUNCTION
This	function	is	useful	to	keep	cooked	foods	warm	for	later	service.	Follow	directions	on
pages	8	and	9	to	set	the	oven	for	this	function.
Ti\bs for using this func\ltion
•
hold	cooked	foods	for	about	10	minutes	in	a	preheated	oven	set	to	200ºF.
•	 Cooked	foods	should	be	kept	at	an	internal	temperature	of	150ºF	or	above.	Use	a	meat	 thermometer	to	check	the	temperature.
•	 Always	use	a	meat...
Page 7
121\f
ENGLISh
8.	 At	the	end	of	the	cooking	cycle,	open	oven	door	using	oven	mitt	or	pot	holder	and
carefully	remove	food.
9.	 Close	the	door	and	press	the	Po WeR
()	button	to	turn	off	the	appliance	and	unplug.
BROIL FUNCTION
Im\bortant: This o\fen uses closed door broiling. Do not attem\bt to kee\b door ajar while
broiling.
Note:	This	oven	allows	you	to	select	a	temperature	at	which	to	broil.	For	foods	such	as
white	fish	fillets,	you	may	wish	to	use	a	lower	temperature.
Caution: When in u\lse, this...
Page 8
1415
ENGLISh
•	 Always	allow	meat	to	stand	for	10	minutes	before	serving	to	allow	the	juices	to
redistribute	in	the	meat,	so	every	slice	will	be	moist	and	tender.
FROZEN SNACKS FUNCTION
•	 This	is	a	good	use	for	this	oven.	Snack	foods	can	be	baked	without	heating	up	a	large	 oven.
Im\bortant: When you o\ben the door, t\lhe cooking function \bau\lses and the blue ba\lcklight
on the digital dis\blay begins to flash. Close the door to resume cooking.
•	 Watch	food	closely	to	avoid	overcooking.
Care and...
Page 9
1617
v
euillez lire et conser\fer ce guide d’entretien et d’utilisation
IMPORTANTES CONSIGNES
DE SÉCURITÉ
lorsqu’on	 utilise	des	appareils	 électriques,	 il	faut	 toujours	 respecter
certaines	 règles	de	sécurité	 fondamentales,	 notamment	les	suivantes	 :
❑	 lire	 toutes	 les	instructions.
❑	 Ne	 pas	 toucher	 aux	surfaces	 chaudes;	 utiliser	les	poignées	 et	les
boutons.
❑	 Afin	 d’éviter	 les	risques	 de	choc	 électrique,	 ne	pas	 immerger	 le
cordon,	 la	fiche	 ou	l’appareil	 dans	l’eau	ou	tout...
Page 10
1819
vIS INDESSERRABLE
A\fertissement : L’a\b\bareil est doté d’une \fis indesserrable em\bêchant
l’enlè\fement du cou\fercle extérieur. Pour réduire les risques
d’incendie ou de secousses électriques, ne \bas tenter de retirer le
cou\fercle extérieur. L’utilisateur ne \beut \bas rem\blacer les \bièces de
l’a\b\bareil. En confier la ré\baration seulement au \bersonnel des centres
de ser\fice autorisés.
CORDON
a)
le	 cordon	 d’alimentation	 de	l’appareil	 est	court	 afin	de	minimiser	 les
risques...


