Home
>
Addonics Technologies
>
Raid Tower
>
Addonics Technologies 4U RAID Rack RR2035RPHMS User Manual
Addonics Technologies 4U RAID Rack RR2035RPHMS User Manual
Here you can view all the pages of manual Addonics Technologies 4U RAID Rack RR2035RPHMS User Manual. The Addonics Technologies manuals for Raid Tower are available online for free. You can easily download all the documents as PDF.
Page 1
www.addonics.com
RAID Rack
(RR2035RPHMS)
Technical Support
If you need any assistance to get your unit functioning properly, please have
your product information ready and contact Addonics Technical Support at:
Hours: 8:30 am - 6:00 pm PST
Phone: 408-453-6212
Email: http://www.addonics.com/support/query/
Page 2
Overview
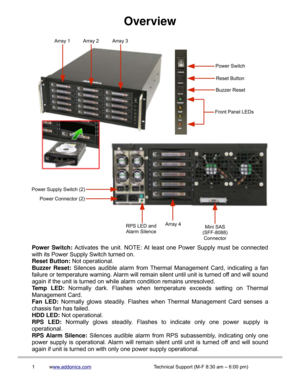
Power Switch:  Activates the unit. NOTE: At least  one Power  Supply must be connected
with its Power Supply Switch turned on.
Reset Button: Not operational.
Buzzer  Reset:  Silences  audible  alarm  from  Thermal  Management  Card,  indicating  a  fan
failure or temperature warning. Alarm will remain silent until unit is turned off and will sound
again if the unit is turned on while alarm condition remains unresolved.
Te m p  L E D :  Normally  dark.  Flashes  when  temperature  exceeds...
Page 3
Port Multiplier Compatibility
The  Port  Multipliers  in  this  unit  will  only  work  with  a  Port  Multiplier  aware  eSATA host
adapter  when  configured  in  JBOD  Mode  (individual  drives).  Identify  your  host  controller
and check with its hardware manufacturer if you are unsure. Addonics offers several Port
Multiplier aware host adapters.
Hot Swapping
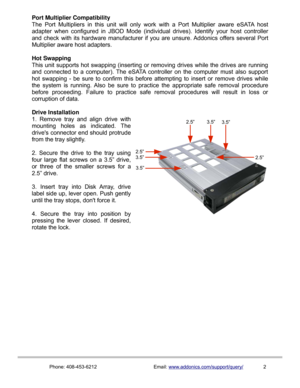
This unit supports hot swapping (inserting or removing drives while the drives are running
and  connected  to a computer).  The  eSATA...
Page 4
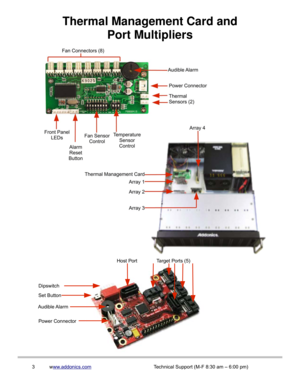
Thermal Management Card and
Port Multipliers
3www.addonics.comTechnical Support (M-F 8:30 am – 6:00 pm)
Set Button
Audible Alarm
Power ConnectorHost Port Target Ports (5)
Dipswitch
Page 5
Port Multiplier Modes
Using  identical  drives  for  all  settings  other  than  JBOD  or  LARGE  is  strongly
recommended. Creating a LARGE array using drives that have different properties will use
all  space  on  all  members,  and  performance  will  match  that  of  the  member  in  use  during
any  particular I/O  operation. Creating  a RAID  using  drives  that  are  not  all  the same size
will  result  in  all members  using  only  as  much space as  the smallest  member.  Creating a
RAID using...
Page 6
RAID 5 (Stripe set with striped parity)
Number of drives: at least 3
Unit capacity: size of one member times number of members minus one.
Spares: yes
Fault tolerance: can withstand the loss of one drive without losing data.
RAID  5  works  by  striping  entire  I/O  blocks  across  all  members  of  the  set,  with  each
member  taking turns carrying parity data computed by the Port Multiplier. In the event  of
failure, the missing information can be calculated using the parity information.
CLONE (Mirror...
Page 7
Configuring the Port Multiplier Using Dipswitches
Resetting the RAID
NOTE:  This  procedure  destroys  all  RAID  data.  It  should  not  harm  individual  drives  or
their  contents;  however,  creating  backups  of  all  data  is  strongly  recommended  before
proceeding.
Be  sure  the  port  multiplier  is connected  to  an  active  host  before  proceeding.  The  port
multiplier will not complete the process if it has no host connection.
1. Power down the unit and set the dip switch to the desired...
Page 8
RAID Mode Switches M2, M1, M0 (SW1:3 – SW1-5)
The  RAID  Mode  switches  define  what  type  of  RAID  will  be initialized  when  the  unit  is
powered up while the RAID Mode button is held down, as follows:
Dipswitch Position1
(BZS)12
(EZ)3
(M2)4
(M1)5
(M0)
JBOD (Individual Drives)
* FACTORY DEFAULT
SETTINGOFFOFF
2OFF OFF OFF
RAID 0 OFFON
3ON ON ON
RAID 1 OR 10 OFF OFF ON ON OFF
RAID 3 OFF OFF ON OFF OFF
RAID 5 OFF OFF OFF ON OFF
CLONE OFF OFF OFF ON ON
LARGE OFFON
3ON OFF ON
NOTES:
1  Audible Alarm is...
Page 9
Configuring the Port Multiplier Using the JMicron RAID Manager
Windows  users  may  install  the  JMicron  HW  RAID  Manager  application  located  on  the
SATA Controller CD, or download it from http://addonics.com/drivers/driver_list.php. In the
CD, browse to Configuration Utilities → JMB393.
Mac  and  Linux  users  may  download  those  versions  of  the  same  utility  from
http://addonics.com/drivers/driver_list.php under “Port Multiplier & Hub.” The JMicron RAID
Manager can be used to create,...
Page 10
Next, click the Basic RAID Configuration tab and select the type of RAID desired. Note that
RAID  1  is  currently  disabled  as  an  option  since  more  than  two  individual  drives  are
available, and DELETE ALL RAID is disabled since there are currently no arrays to delete.
Shown below is the same set of drives being selected as a LARGE array.
Finally, click Apply. The Jmicron RAID Manager will confirm the operation with a reminder
that existing data on the drives will be lost, then perform the RAID...


