Windmere 10Cup Coffeemaker TSK196A User Manual
Here you can view all the pages of manual Windmere 10Cup Coffeemaker TSK196A User Manual. The Windmere manuals for Coffee Grinder are available online for free. You can easily download all the documents as PDF.
Page 1
10-CUP PROGRAMMABLE
COFFEE MAKER
USE AND CARE BOOK
HOUSEHOLD USE ONLY
Pages 1-6
CAFETERA PROGRAMABLE
PARA 10 TAZAS
MANUAL DE USO Y MANTENIMIENTO
PARA USO DOMESTICO SOLAMENTE
P‡ginas 7-13
ª
2000/3-20-33E/S.WPL.FMEYER.COF.  5/1/00  3:30 PM  Page 1
Page 2
1
IMPORTANT SAFEGUARDSWhen using electrical appliances especially when children are present, basic safety
precautions should always be followed to reduce the risk of fire, electric shock, and/or
injury to persons, including the following:
1.READ ALL INSTRUCTIONS.
2. Do not touch hot surfaces. Use handle or knobs.
3. To protect against electric shock, do not place cord, plug or appliance in water
or other liquids.
4. Close supervision is necessary when any appliance is used by or near children.
5. Unplug...
Page 3
3
2
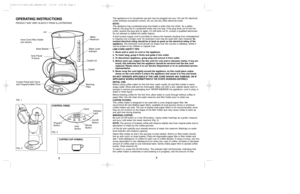
This appliance is for household use and may be plugged into any 120-volt AC electrical
outlet (ordinary household current). Do not use any other electrical outlet.
NOTE:
This appliance has a polarized plug (one blade is wider than the other). As a safety
feature, this plug fits in a polarized outlet only one way. If the plug does not fit into the
outlet, reverse the plug and try again. If it still does not fit, contact a qualified electrician.
Do not attempt to defeat this safety feature.
A short...
Page 4
5
4
1. Press the On/Off button and hold it. The clock display will show 3:59. To adjust the
Keep Warm time, press the hour and then the minute button. (Remember that
numerals will run BACKWARD when Keep Warm feature is being programmed.)
2. When desired Keep Warm time has been reached, release the On/Off button. The red
indicator light will go off.
3. The programmed heating time will now be stored in memory, and the clock will once
again show correct time.
AUTO PAUSE ÕN SERVE:
The Auto Pause Õn Serve...
Page 5
7 6
INSTRUCCIONES IMPORTANTES
DE SEGURIDADCuando use aparatos elŽctricos, especialmente cuando hayan ni–os, medidas b‡sicas de
seguridad deben seguirse para reducir el riesgo de fuego, choque elŽctrico y/o lesiones
personales, incluyendo las siguientes:
1.LEA TODAS LAS INSTRUCCIONES.
2. No toque las superficies que est‡n calientes. Use agarraderas o manecillas.
3. Para protegerse contra choques elŽctricos, no sumerja el cord—n, enchufe
o el artefacto en agua u otros l’quidos.
4.  Atenta supervisi—n es...
Page 6
9
8
Este artefacto es para uso domŽstico solamente y puede ser enchufado en cualquier
tomacorriente de corriente alterna de 120 voltios (corriente ordinaria domŽstica).
No use ningœn otro tomacorriente elŽctrico.
NOTA:
Este artefacto tiene un enchufe polarizado (una hoja es m‡s ancha que la otra). Como
medida de seguridad, este enchufe s—lo debe usarse en un tomacorriente polarizado en
un s—lo sentido. Si no entrara en el tomacorriente, invierta el enchufe y trate nuevamente.
Si aœn as’ no entrara,...
Page 7
4. Para activar el funcionamiento autom‡tico, presione brevemente el bot—n PROGRAM
(PROGRAMACION). El s’mbolo de la taza de cafŽ      se encender‡ y la hora fijada
que comenzar‡ a colar ser‡ expuesta moment‡neamente. El reloj luego regresar‡ a la
hora actual, pero el s’mbolo de la taza de cafŽ      permanecer‡ encendido indicando
que el funcionamiento autom‡tico ha sido activado.
5. Cuando comience el proceso de colado, el s’mbolo de la taza de cafŽ      se apagar‡
y la luz indicadora se encender‡...
Page 8
1213
GARANTIA LIMITADA POR UN A„ODentro de un a–o de garant’a, nosotros le reemplazaremos este artefacto sin
costo alguno por defectos en material o manufactura. Para reemplazo, env’e el
artefacto con evidencia de compra. Esta garant’a es nula si el artefacto se ha
ca’do, abusado, alterado o mal usado en cualquier forma.GUARDE PARA REFERENCIA
Deje que se enfr’e la unidad por 10 minutos; luego enju‡guela llenando el dep—sito para
el agua con agua limpia y fr’a, colocando un nuevo filtro y encendiŽndola,...
Page 9
Printed in/Impreso en Hong Kong2000/3-20-33E/STSK-196 (UL/SPE)
2000/3-20-33E/S.WPL.FMEYER.COF.  5/1/00  3:30 PM  Page 16


