compaq evo n610c and evo n600c User Manual
Here you can view all the pages of manual compaq evo n610c and evo n600c User Manual. The Compaq manuals for Notebook are available online for free. You can easily download all the documents as PDF.
Page 111
5–22Maintenance and Service Guide
Removal and Replacement Procedures
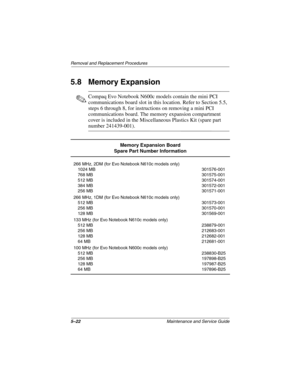
5.8 Memory Expansion
✎Compaq Evo Notebook N600c models contain the mini PCI
communications board slot in this location. Refer to Section 5.5,
steps 6 through 8, for instructions on removing a mini PCI
communications board. The memory expansion compartment
cover is included in the Miscellaneous Plastics Kit (spare part
number 241439-001).
Memory Expansion Board
Spare Part Number Information
266 MHz, 2DM (for Evo Notebook N610c...
Page 112
Removal and Replacement Procedures
Maintenance and Service Guide5–23
1. Prepare the notebook for disassembly (Section 5.3).
2. Remove the keyboard (Section 5.7).
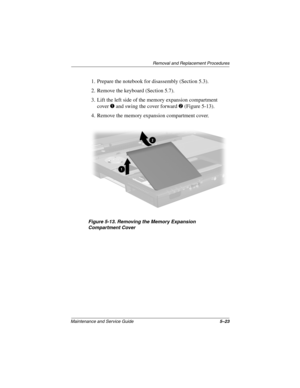
3. Lift the left side of the memory expansion compartment
cover
1 and swing the cover forward 2 (Figure 5-13).
4. Remove the memory expansion compartment cover.
Figure 5-13. Removing the Memory Expansion
Compartment Cover
279362-001.book  Page 23  Monday, July 8, 2002  11:49 AM
Page 113
5–24Maintenance and Service Guide
Removal and Replacement Procedures
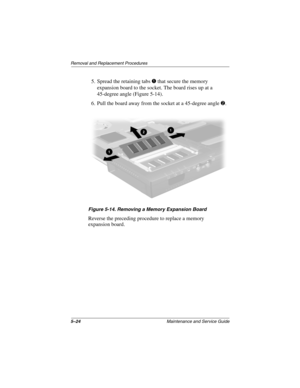
5. Spread the retaining tabs 1 that secure the memory
expansion board to the socket. The board rises up at a
45-degree angle (Figure 5-14).
6. Pull the board away from the socket at a 45-degree angle
2.
Figure 5-14. Removing a Memory Expansion Board
Reverse the preceding procedure to replace a memory
expansion board.
279362-001.book  Page 24  Monday, July 8, 2002  11:49 AM
Page 114
Removal and Replacement Procedures
Maintenance and Service Guide5–25
5.9 TouchPad
1. Prepare the notebook for disassembly (Section 5.3).
2. Remove the keyboard (Section 5.7).
3. Remove the memory expansion compartment cover
(Section 5.8).
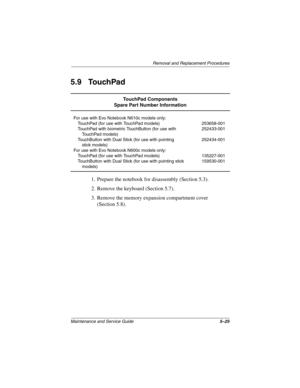
TouchPad Components
Spare Part Number Information
For use with Evo Notebook N610c models only:
TouchPad (for use with TouchPad models)
TouchPad with biometric TouchButton (for use with
TouchPad models)
TouchButton with Dual Stick (for use with pointing
stick models)...
Page 115
5–26Maintenance and Service Guide
Removal and Replacement Procedures
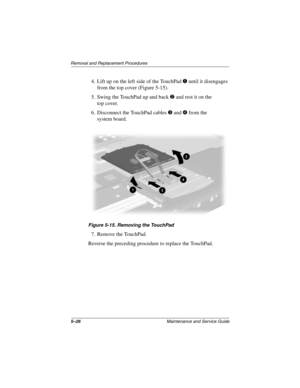
4. Lift up on the left side of the TouchPad 1 until it disengages
from the top cover (Figure 5-15).
5. Swing the TouchPad up and back
2 and rest it on the
top cover.
6. Disconnect the TouchPad cables
3 and 4 from the
system board.
Figure 5-15. Removing the TouchPad
7. Remove the TouchPad.
Reverse the preceding procedure to replace the TouchPad.
279362-001.book  Page 26  Monday, July 8, 2002  11:49 AM
Page 116
Removal and Replacement Procedures
Maintenance and Service Guide5–27
5.10 Switch Cover
1. Prepare the notebook for disassembly (Section 5.3).
2. Remove the keyboard (Section 5.7).
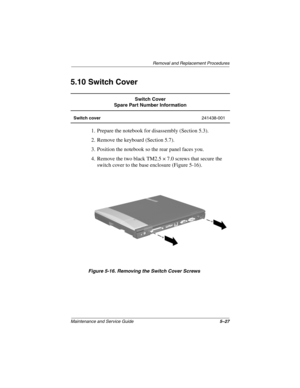
3. Position the notebook so the rear panel faces you.
4. Remove the two black TM2.5 × 7.0 screws that secure the
switch cover to the base enclosure (Figure 5-16).
Figure 5-16. Removing the Switch Cover Screws
Switch Cover
Spare Part Number Information
Switch cover241438-001
279362-001.book  Page 27  Monday, July 8, 2002  11:49...
Page 117
5–28Maintenance and Service Guide
Removal and Replacement Procedures
5. Position the notebook so the front faces you.
6. Open the notebook as far as it will open.
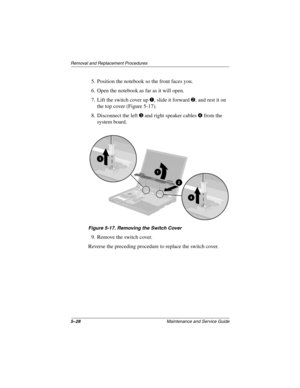
7. Lift the switch cover up
1, slide it forward 2, and rest it on
the top cover (Figure 5-17).
8. Disconnect the left
3 and right speaker cables 4 from the
system board.
Figure 5-17. Removing the Switch Cover
9. Remove the switch cover.
Reverse the preceding procedure to replace the switch cover.
279362-001.book  Page 28  Monday, July 8,...
Page 118
Removal and Replacement Procedures
Maintenance and Service Guide5–29
5.11 Display
1. Prepare the notebook for disassembly (Section 5.3).
2. Remove the keyboard (Section 5.7).
3. Remove the switch cover (Section 5.10).
4. Position the display so that it is vertical.
Display
Spare Part Number Information
For use with Evo Notebook N610c models only:
14.1-inch, SXGA+, CTFT
14.1-inch, XGA, CTFT
For use with Evo Notebook N600c models only:
14.1-inch, SXGA+, CTFT
14.1-inch, XGA, CTFT291261-001
291262-001...
Page 119
5–30Maintenance and Service Guide
Removal and Replacement Procedures
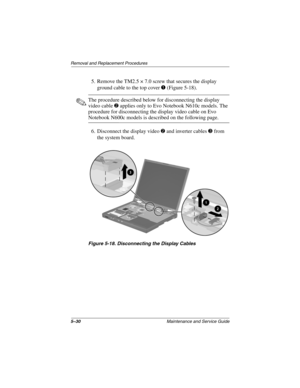
5. Remove the TM2.5 × 7.0 screw that secures the display
ground cable to the top cover
1 (Figure 5-18).
✎The procedure described below for disconnecting the display
video cable
2 applies only to Evo Notebook N610c models. The
procedure for disconnecting the display video cable on Evo
Notebook N600c models is described on the following page.
6. Disconnect the display video
2 and inverter cables 3 from
the system board.
Figure...
Page 120
Removal and Replacement Procedures
Maintenance and Service Guide5–31
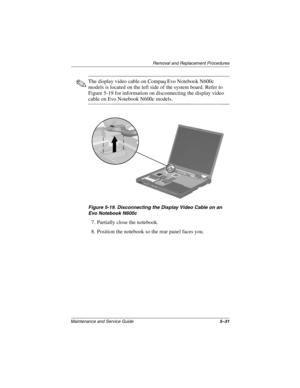
✎The display video cable on Compaq Evo Notebook N600c
models is located on the left side of the system board. Refer to
Figure 5-19 for information on disconnecting the display video
cable on Evo Notebook N600c models.
Figure 5-19. Disconnecting the Display Video Cable on an
Evo Notebook N600c
7. Partially close the notebook.
8. Position the notebook so the rear panel faces you.
279362-001.book  Page 31  Monday, July 8, 2002  11:49 AM
