OKI C610n User Manual
Here you can view all the pages of manual OKI C610n User Manual. The Oki manuals for Printer are available online for free. You can easily download all the documents as PDF.
Page 71
71 – C610/C711 User’s Guide
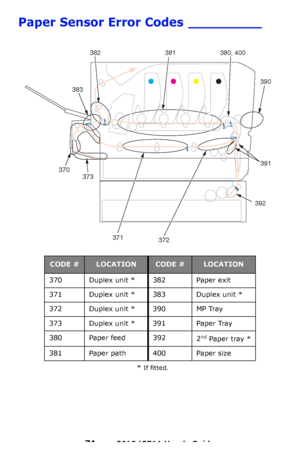
Paper Sensor Error Codes _________
* If fitted.
CODE #LOCATIONCODE #LOCATION
370 Duplex unit * 382 Paper exit
371 Duplex unit * 383 Duplex unit *
372 Duplex unit * 390 MP Tray
373 Duplex unit * 391 Paper Tray
380 Paper feed 392 2
nd Paper tray *
381 Paper path 400 Paper size
370373
382
383
381 380, 400
390
372
371
392
391
Downloaded From ManualsPrinter.com Manuals
Page 72
72 – C610/C711 User’s Guide
Clearing Paper Jams
1.If a sheet is well advanced out of the top of the printer,
simply grip it and pull gently to  draw it fully out. If it does
not remove easily, do not use excessive force. It can be
removed from the rear later.
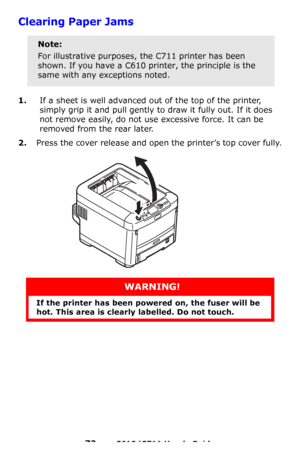
2.Press the cover release and open the printer’s top cover fully.
Note:
For illustrative purposes, the C711 printer has been
shown. If you have a C610 printer, the principle is the
same with any exceptions noted.
WARNING!
If the printer has...
Page 73
73 – C610/C711 User’s Guide
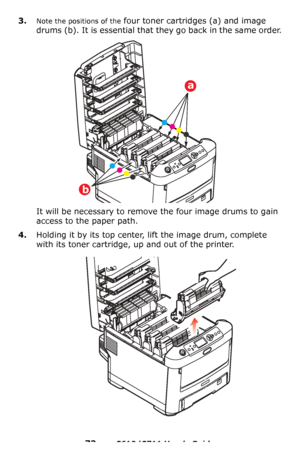
3.Note the positions of the four toner cartridges (a) and image
drums (b). It is essential that they go back in the same order.
It will be necessary to remove the four image drums to gain
access to the paper path.
4.Holding it by its top center, lift the image drum, complete
with its toner cartridge, up and out of the printer.
a
b
Downloaded From ManualsPrinter.com Manuals
Page 74
74 – C610/C711 User’s Guide
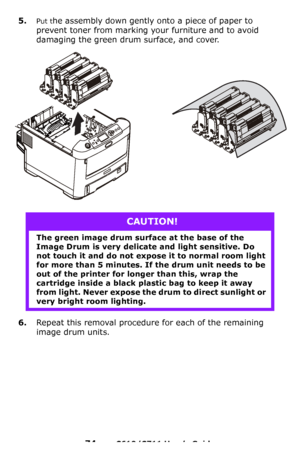
5.Put the assembly down gently onto a piece of paper to
prevent toner from marking yo ur furniture and to avoid
damaging the green drum surface, and cover.
6.Repeat this removal procedure for each of the remaining
image drum units.
CAUTION!
The green image drum surface at the base of the
Image Drum is very delicate and light sensitive. Do
not touch it and do not expose it to normal room light
for more than 5 minutes. If  the drum unit needs to be
out of the printer for...
Page 75
75 – C610/C711 User’s Guide
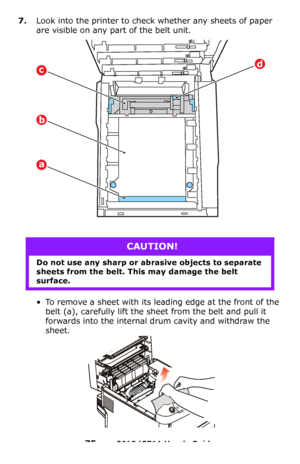
7.Look into the printer to check whether any sheets of paper
are visible on any part of the belt unit.
• To remove a sheet with its leading edge at the front of the belt
 (a), carefully lift the sheet from the belt and pull it
forwards into the internal drum cavity and withdraw the
sheet.
CAUTION!
Do not use any sharp or abrasive objects to separate
sheets from the belt. This may damage the belt
surface.
dc
b
a
Downloaded From ManualsPrinter.com Manuals
Page 76
76 – C610/C711 User’s Guide
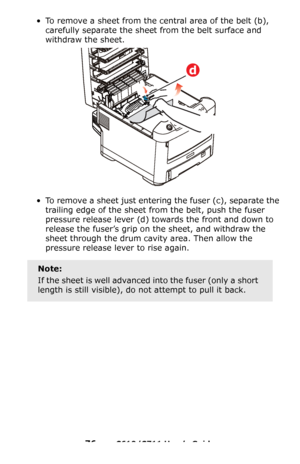
• To remove a sheet from the central area of the belt (b),
carefully separate the shee t from the belt surface and
withdraw the sheet.
• To remove a sheet just entering the fuser (c), separate the
trailing edge of the sheet from the belt, push the fuser
pressure release lever
 (d) towards the front and down to
release the fuser’s grip on  the sheet, and withdraw the
sheet through the drum cavity area. Then allow the
pressure release lever to rise again.
Note:
If the...
Page 77
77 – C610/C711 User’s Guide
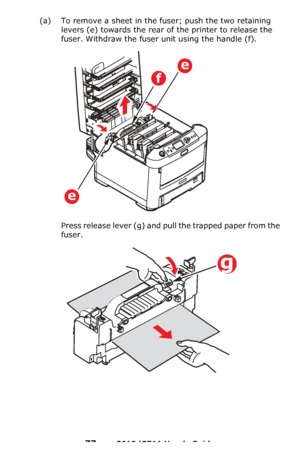
(a) To remove a sheet in the fuser; push the two retaining
levers
 (e) towards the rear of the printer to release the
fuser. Withdraw the fuser unit using the handle (f).
Press release lever (g) and pull the trapped paper from the
fuser.
e
f
e
g
Downloaded From ManualsPrinter.com Manuals
Page 78
78 – C610/C711 User’s Guide
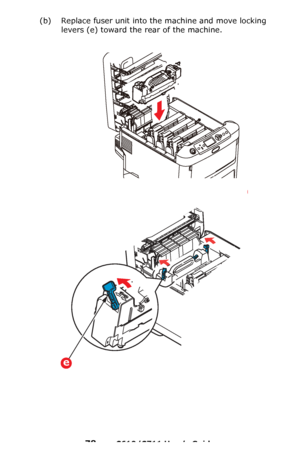
(b) Replace fuser unit into the machine and move locking levers (e) toward the rear of the machine.
e
Downloaded From ManualsPrinter.com Manuals
Page 79
79 – C610/C711 User’s Guide
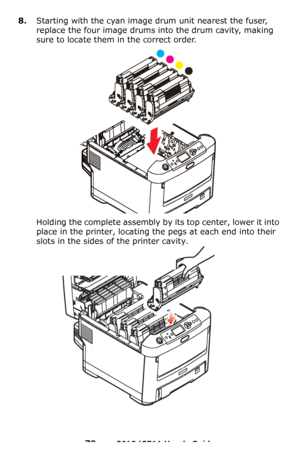
8.Starting with the cyan image drum unit nearest the fuser,
replace the four image drums into the drum cavity, making
sure to locate them in the correct order.
Holding the complete assembly by  its top center, lower it into
place in the printer, locating the pegs at each end into their
slots in the sides of the printer cavity.
Downloaded From ManualsPrinter.com Manuals
Page 80
80 – C610/C711 User’s Guide
9.Lower the top cover but do not press down to latch it closed
yet. This will protect the drums from excessive exposure to
room lighting while you check the remaining areas for
jammed sheets.
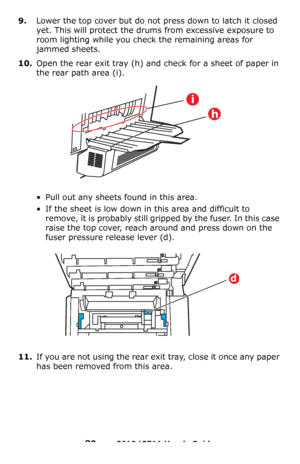
10.Open the rear exit tray (h) and check for a sheet of paper in
the rear path area
 (i).
• Pull out any sheets found in this area.
• If the sheet is low down in this area and difficult to
remove, it is probably still gripped by the fuser. In this case
raise the top cover, reach...
