Acer Aspire 5534 Service Guide
Here you can view all the pages of manual Acer Aspire 5534 Service Guide. The Acer manuals for Notebook are available online for free. You can easily download all the documents as PDF.
Page 53
Chapter 343
Machine Disassembly and Replacement
This chapter contains step-by-step procedures on how to disassemble the notebook computer for
maintenance and troubleshooting.
Disassembly Requirements
To disassemble the computer, you need the following tools:
qWrist grounding strap and conductive mat for preventing electrostatic discharge
qFlat screwdriver
qPhilips screwdriver
qPlastic flat screwdriver
qPlastic tweezers
NOTE: The screws for the different components vary in size. During the disassembly...
Page 54
44Chapter 3
General Information
Pre-disassembly Instructions
Before proceeding with the disassembly procedure, make sure that you do the following:
1.Turn off the power to the system and all peripherals.
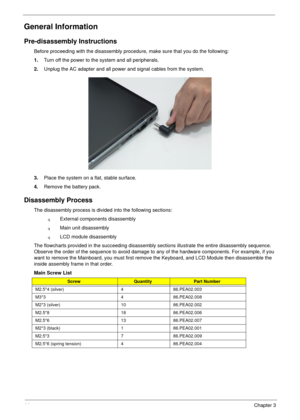
2.Unplug the AC adapter and all power and signal cables from the system.
3.Place the system on a flat, stable surface.
4.Remove the battery pack.
Disassembly Process
The disassembly process is divided into the following sections:
qExternal components disassembly
qMain unit disassembly
qLCD module...
Page 55
Chapter 345
External Module Disassembly Process
NOTE: The product previews seen in the disassembly procedures may not represent the final product color or
configuration.
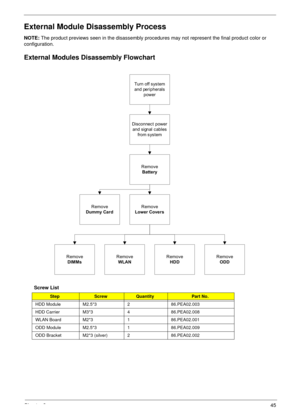
External Modules Disassembly Flowchart
Screw List
StepScrewQuantityPart No.
HDD Module M2.5*3 2 86.PEA02.003
HDD Carrier M3*3 4 86.PEA02.008
WLAN Board M2*3 1 86.PEA02.001
ODD Module M2.5*3 1 86.PEA02.009
ODD Bracket M2*3 (silver) 2 86.PEA02.002
Disconnect power
and signal cables
from system
Remove
Battery
Turn off system
and...
Page 56
46Chapter 3
Removing the Battery Pack
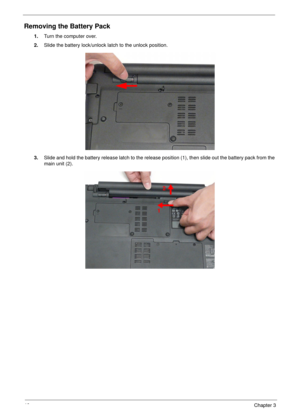
1.Turn the computer over.
2.Slide the battery lock/unlock latch to the unlock position.
3.Slide and hold the battery release latch to the release position (1), then slide out the battery pack from the
main unit (2).
12
Page 57
Chapter 347
Removing the Hard Disk Drive Module
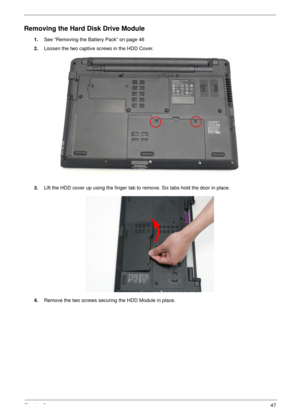
1.See “Removing the Battery Pack” on page 46
2.Loosen the two captive screws in the HDD Cover.
3.Lift the HDD cover up using the finger tab to remove. Six tabs hold the door in place.
4.Remove the two screws securing the HDD Module in place.
Page 58
48Chapter 3
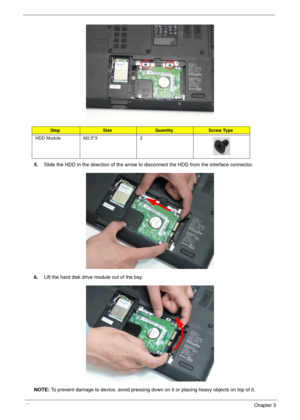
5.Slide the HDD in the direction of the arrow to disconnect the HDD from the interface connector.
6.Lift the hard disk drive module out of the bay.
NOTE: To prevent damage to device, avoid pressing down on it or placing heavy objects on top of it.
StepSizeQuantityScrew Type
HDD Module M2.5*3 2
Page 59
Chapter 349
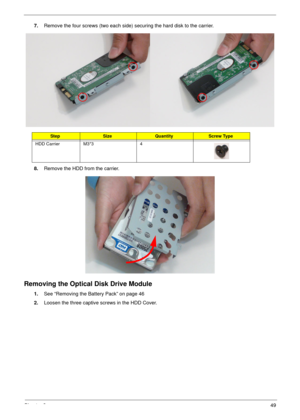
7.Remove the four screws (two each side) securing the hard disk to the carrier.
8.Remove the HDD from the carrier.
Removing the Optical Disk Drive Module
1.See “Removing the Battery Pack” on page 46
2.Loosen the three captive screws in the HDD Cover.
StepSizeQuantityScrew Type
HDD Carrier M3*3 4
Page 60
50Chapter 3
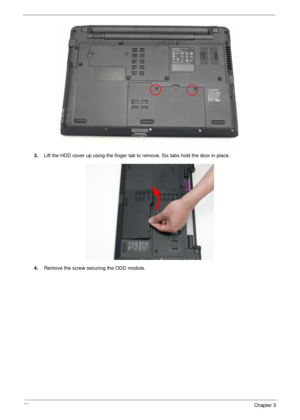
3.Lift the HDD cover up using the finger tab to remove. Six tabs hold the door in place.
4.Remove the screw securing the ODD module.


