Acer Aspire 5534 Service Guide
Here you can view all the pages of manual Acer Aspire 5534 Service Guide. The Acer manuals for Notebook are available online for free. You can easily download all the documents as PDF.
Page 61
Chapter 351
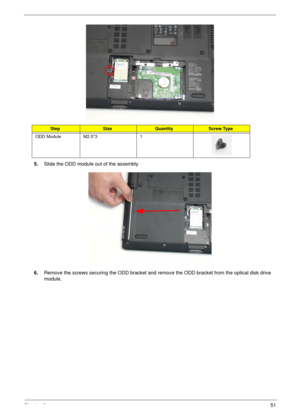
5.Slide the ODD module out of the assembly
6.Remove the screws securing the ODD bracket and remove the ODD bracket from the optical disk drive
module.
StepSizeQuantityScrew Type
ODD Module M2.5*3 1
Page 62
52Chapter 3

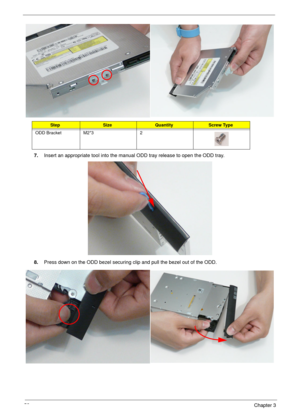
7.Insert an appropriate tool into the manual ODD tray release to open the ODD tray.
8.Press down on the ODD bezel securing clip and pull the bezel out of the ODD.
StepSizeQuantityScrew Type
ODD Bracket M2*3 2
Page 63
Chapter 353
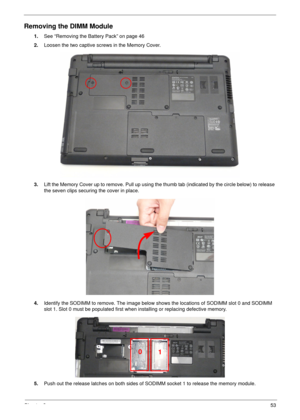
Removing the DIMM Module
1.See “Removing the Battery Pack” on page 46
2.Loosen the two captive screws in the Memory Cover.
3.Lift the Memory Cover up to remove. Pull up using the thumb tab (indicated by the circle below) to release
the seven clips securing the cover in place.
4.Identify the SODIMM to remove. The image below shows the locations of SODIMM slot 0 and SODIMM
slot 1. Slot 0 must be populated first when installing or replacing defective memory.
5.Push out the release latches on...
Page 64
54Chapter 3
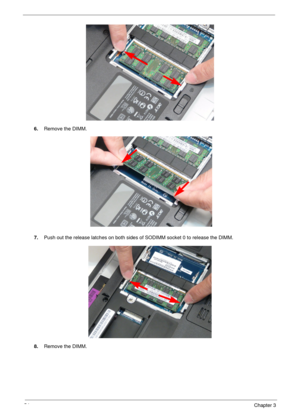
6.Remove the DIMM.
7.Push out the release latches on both sides of SODIMM socket 0 to release the DIMM.
8.Remove the DIMM.
Page 66
56Chapter 3
Removing the WLAN Board
1.See “Removing the Battery Pack” on page 46.
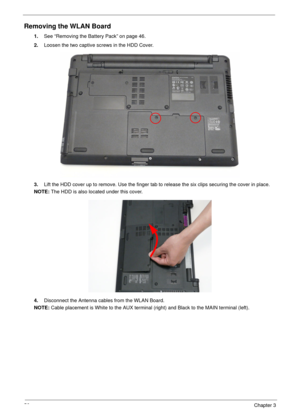
2.Loosen the two captive screws in the HDD Cover.
3.Lift the HDD cover up to remove. Use the finger tab to release the six clips securing the cover in place.
NOTE: The HDD is also located under this cover.
4.Disconnect the Antenna cables from the WLAN Board.
NOTE: Cable placement is White to the AUX terminal (right) and Black to the MAIN terminal (left).
Page 67
Chapter 357
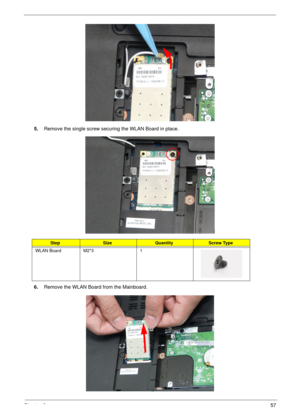
5.Remove the single screw securing the WLAN Board in place.
6.Remove the WLAN Board from the Mainboard.
StepSizeQuantityScrew Type
WLAN Board M2*3 1
Page 68
58Chapter 3
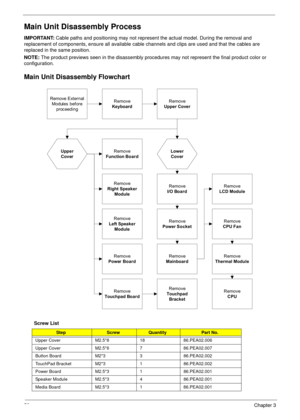
Main Unit Disassembly Process
IMPORTANT: Cable paths and positioning may not represent the actual model. During the removal and
replacement of components, ensure all available cable channels and clips are used and that the cables are
replaced in the same position.
NOTE: The product previews seen in the disassembly procedures may not represent the final product color or
configuration.
Main Unit Disassembly Flowchart
Screw List
StepScrewQuantityPart No.
Upper Cover M2.5*8 18 86.PEA02.006...
Page 69
Chapter 359
I/O Board M2.5*6 1 86.PEA02.007
Mainboard M2.5*6 1 86.PEA02.007
Mainboard (Fan) M2.5*6 1 86.PEA02.007
LCD Module M2.5*6 3 86.PEA02.007
Fan M2.5*6 1 86.PEA02.007
Thermal Module M2.5*6 (spring
tension)4 86.PEA02.004
StepScrewQuantityPart No.
Page 70
60Chapter 3
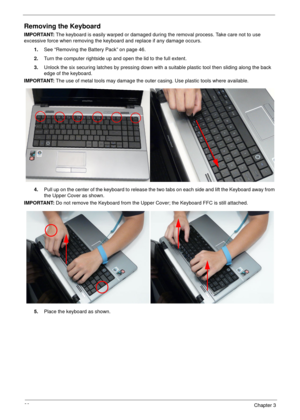
Removing the Keyboard
IMPORTANT: The keyboard is easily warped or damaged during the removal process. Take care not to use
excessive force when removing the keyboard and replace if any damage occurs.
1.See “Removing the Battery Pack” on page 46.
2.Turn the computer rightside up and open the lid to the full extent.
3.Unlock the six securing latches by pressing down with a suitable plastic tool then sliding along the back
edge of the keyboard.
IMPORTANT: The use of metal tools may damage the...
